In Part 2 of the series CI/CD on Kubernetes we set up cluster autoscaling for a dedicated Jenkins agent node pool by utilizing the PodNodeSelector and LimitRanger admission controllers. In Part 3 of this CI/CD on Kubernetes series we will take advantage of another admission controller to scale-up the Jenkins agents node pool before a new request for a Jenkins agent pod requires the additional capacity. In other words, we want to initiate scaling-up of the Jenkins agent node pool before it is actually needed. This will minimize queueing of Jenkins jobs - resulting in faster CI/CD. I referred to this concept in the title of this post as Just-in-Time Autoscaling, a more realistic description may be preemptive autoscaling. Preemptive because we will use priority and preemption Kubernetes scheduling to allow for overprovisioning of lower priority pods that will be preempted to make room for Jenkins agent pod requests - resulting in scaling-up before we need the additional node capacity for Jenkins agents while still having the immediate required capacity for the Jenkins agent pod request(s) that triggered the preemptive up-scale. Preemptive autoscaling will help avoid, or at least minimize, the amount of time that any Jenkins job spends in the Jenkins build queue waiting for agents, but still use only the amount of infrastructure needed at any given time - although there are a few caveats to this that we will explore in this post.
Preemptive Autoscaling with Priority
The solution for Just-in-Time or preemptive autoscaling presented in this post depends on the Priority admission controller.
NOTE: The Priority admission controller has been alpha since Kuberentes 1.8, and is beta and enabled by default for Kubernetes 1.11.
The Priority admission controller allows you to add priorityClassName meta-data to a pod on creation and prioritize the scheduling of the pods in the cluster based on the lower or higher priority of other pods. When high priority pods are requested in a cluster with the Priority admission controller enabled and there are not enough node resources to accomodate them - the Kubernetes scheduler will evict lower priority pods to make room for pending, higher priority pods. Coupling priority and preemption with the Cluster Autoscaler provides premeptive up-scaling - as lower priority pods are preempted to make room for higher priority pods. This results in the Cluster Autoscaler initiating a scale-up to make room for the evicted low priority pods. These low priority pods that we want to be preempted for a Jenkins agent pod request don’t need to do anything except request a certain amount of cluster resources (cpu and memory) and must have a lower priority than the Jenkins agent pods. Therefore we will utilize special containers called pause containers (read more about pause containers) to create pods with the sole purpose of consuming a certain amounut of cpu and memory resources to enable a preemptive scale-up of the Jenkins agent node pool when a Jenkins agent pod is requested. We will create a Deployment of low priority pods using pause containers and with resource quotas and replicas configured and sized appropriately to accomodate one or more Jenkins agent pods in this example environment.
Enabling the Priority Admission Controller
In part one of this series we saw how to enable an admission controller with kops. The Priority admission controllers will be slightly more involved.
NOTE: Although we will be using kops for the examples in this post, it is worth mentioning that at the time this was published, Azure’s AKS and Amazon’s EKS did not enable or provide a way to enable the Priority Admission Controller - hopefully it is enabled by default once AKS and EKS adopt Kubernetes 1.11. GKE has support for the Priority Admission Controller, but it is only available on alpha clusters at the time of this post.
In addition to adding the Priority admission controller to the the kubeAPIServer admissionControl list like we did for PodNodeSelector in the first post, we also have to set the PodPriority feature gate to true for the kubeAPIServer, kubeScheduler and kubelet. Once againe we will use the kops edit cluster command to make the changes to the cluster.
 ...
 kubeAPIServer:
    address: 127.0.0.1
    admissionControl:
    - Initializers
    - NamespaceLifecycle
    - LimitRanger
    - ServiceAccount
    - PersistentVolumeLabel
    - DefaultStorageClass
    - DefaultTolerationSeconds
    - NodeRestriction
    - Priority
    - ResourceQuota
    - PodNodeSelector
    allowPrivileged: true
...
    featureGates:
      PodPriority: "true"
    image: gcr.io/google_containers/kube-apiserver:v1.9.3
    insecurePort: 8080
...
  kubeScheduler:
    featureGates:
      PodPriority: "true"
  kubelet:
    featureGates:
      PodPriority: "true"
...
Once you have saved the changes you will need to update your cluster - for kops: kops update cluster --yes. If this is an existing cluster then you will also have to perform a rolling-update: kops rolling-update cluster --yes.
NOTE: If you are enabling additional admission controllers on a new cluster you should do it before you apply the configuration or a rolling-update of all of your cluster nodes will be required.
Priority Classes
Now that we have enabled the Priority admission controller and PodPriority featureGates, we will create two PriorityClasses. One being utilized as a default for all pods that don’t specify a PriorityClass (all of the Jenkins agent pods) and the other PriorityClass for the overprovisioned low priority preemptible pods.
NOTE: If you don’t specify a
globalDefaultPriorityClassthen anypodthat does not specify apriorityClassNamewill be assigned a priority value of 0.
apiVersion: scheduling.k8s.io/v1alpha1
kind: PriorityClass
metadata:
  name: default-priority
value: 1
globalDefault: true
description: "Default PriorityClass for pods that don't specify a PriorityClass."
apiVersion: scheduling.k8s.io/v1alpha1
kind: PriorityClass
metadata:
  name: overprovisioning
value: -1
globalDefault: false
description: "Priority class used by overprovisioning."
Size Matters
A key element of Just-in-Time autoscaling is that when an overprovisioned pod is preempted it leaves enough cpu and memory resources so that a Jenkins agent pod is able to be scheduled on that node immediately. To figure out the optimum size for the overprovisoned preemptible pod(s) we need to look at both the instance types selected for the Jenkins agent node pool and the LimitRange applied to pods and containers for Jenkins agent pods. We set a machineType of m5.xlarge for the Jenkins agent node pool in the first part of this series. An m5.xlarge has 4 vCPU and 16Gib of memory. Next we have to account for LimitRanges and in the second part of this series we set Limit Ranges for the pods and containers in the Jenkins agent node pool. We set the minimum cpu to 0.25 and minimum memory to 500Mi, and the maximum cpu to 2 and the maximum memory to 4Gi for containers. The maximum for an entire pod (sum of all containers in a pod) was set to 3 cpu and 8Gi memory.
Now that we know the amount of cpu and memory that is available for a Jenkins agent node and the LimitRange for Jenkins agent pods we can figure out the sizing for the overprovisoned preemptible pod(s) Deployment. For this example we want to configure the Deployment so that there is preemptible capacity for either two Jenkins agent pods with two containers using the default limits for a total of 1 cpu and 2Gi memory OR one Jenkins agent pod where the default JNLP container uses the default limits and the second job specific container (for example maven) uses max limits for a total of 2.25 cpu and 4.5Gi memory. We also want to ensure that the overprovisioning Deployment is able to be scheduled on one node so that the Jenkins agent node pool is able to be scaled down to one node when there are no Jenkins agent requests.
Overprovisioning Deployment
Now that we have figured out the cpu and memory requests based on the cpu and memory availale on a Jenkins agent node and the LimitRange for Jenkins agent pods, we will create a Deployment for the preemptible pods utilizing the special pause containers mentioned above.
apiVersion: apps/v1
kind: Deployment
metadata:
  name: overprovisioning
  namespace: jenkins-agents
spec:
  replicas: 5
  selector:
    matchLabels:
      run: overprovisioning
  template:
    metadata:
      labels:
        run: overprovisioning
    spec:
      priorityClassName: overprovisioning
      containers:
      - name: reserve-resources
        image: k8s.gcr.io/pause
        resources:
          requests:
            cpu: "0.5"
            memory: "1Gi"
With 5 replicas and the above cpu and memory request for the pause container the Deployment will have a total footprint of 2.5 cpu and 5Gi of memory - easily fitting on one Jenkins agent node as specified for this example environment. Furthermore, by using multiple replicas we will increase the likelihood of having enough capacity on any up-scaled node for the largest possible Jenkins agent pod with 3 cpu and 8Gi of memory.
Update the Cluster Autoscaler Deployment
Finally, to make all of this work, we need to make a minor change to the clusterAutoscalerDeployment.yml from part two. By default, the Cluster Autoscaler will kill any pods with a priority less than 0 when scaling down and won’t initiate scale-up for these pods. However, this behavior can be overridden by setting the expendable-pods-priority-cutoff flag to -1 in this case, to match the overprovisioning PriorityClass created above. Once those changes are applied to the Cluster Autoscaler Deployment we will have Just-in-Time autoscaling for our Jenkins agents. We just need to update the command section of the configuration from the last post with the expendable-pods-priority-cutoff flag and apply the change:
          command:
            - ./cluster-autoscaler
            - --v=4
            - --stderrthreshold=info
            - --cloud-provider=aws
            - --skip-nodes-with-local-storage=false
            - --nodes=2:10:agentnodes.k8s.kurtmadel.com
            - --expendable-pods-priority-cutoff=-1
The following diagrams illustrate four distinct phases of Just-in-Time autoscaling.
1. Initial setup: 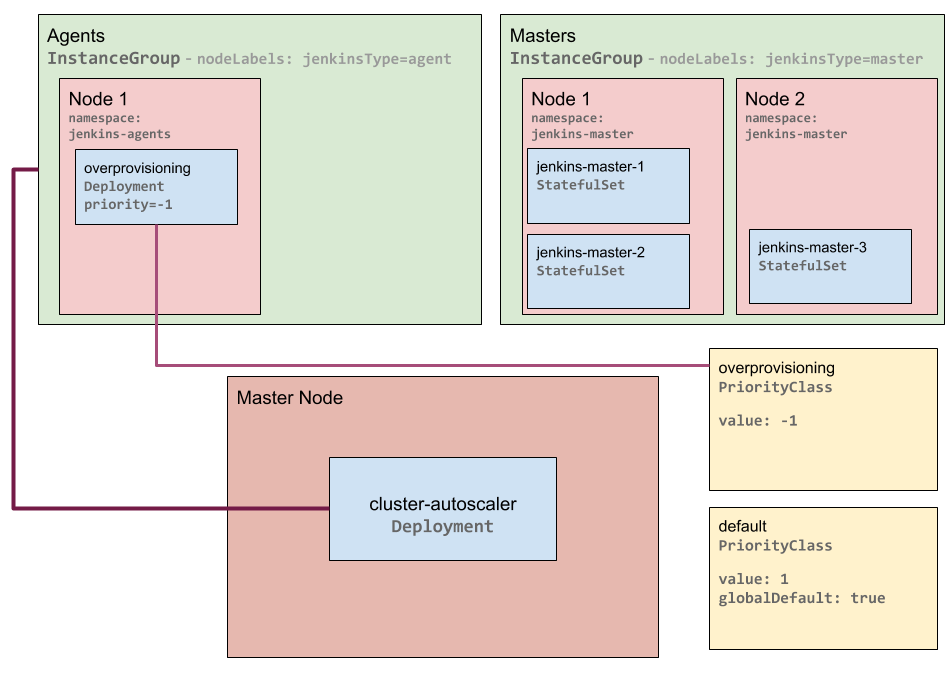
Kubernetes Just-in-Time Autoscaling - Initial Overprovisioned Pod
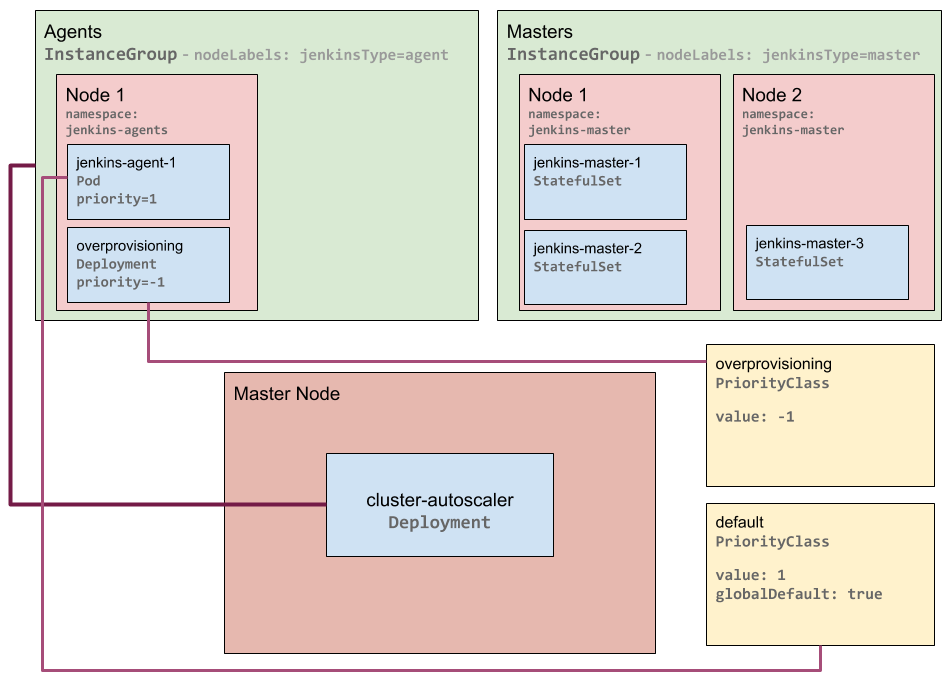
Kubernetes Just-in-Time Autoscaling - Full Capacity Node
pod and triggers an up-scale by the Cluster Autoscaler: 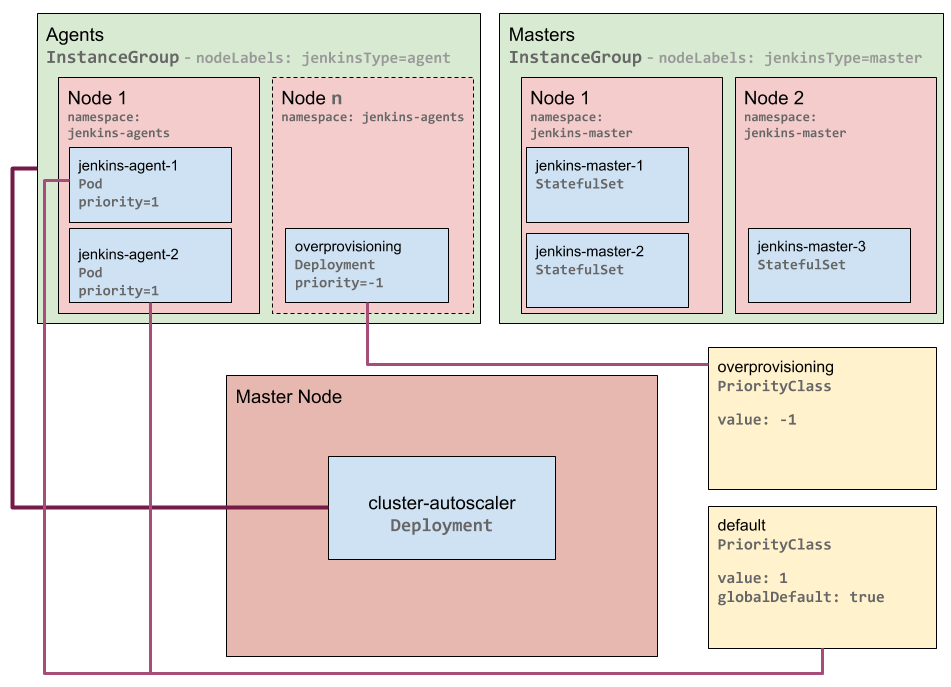
Kubernetes Just-in-Time Autoscaling - Preemption and Up-scaling
pod is request there is a new node with available capacity - Just-in-Time: 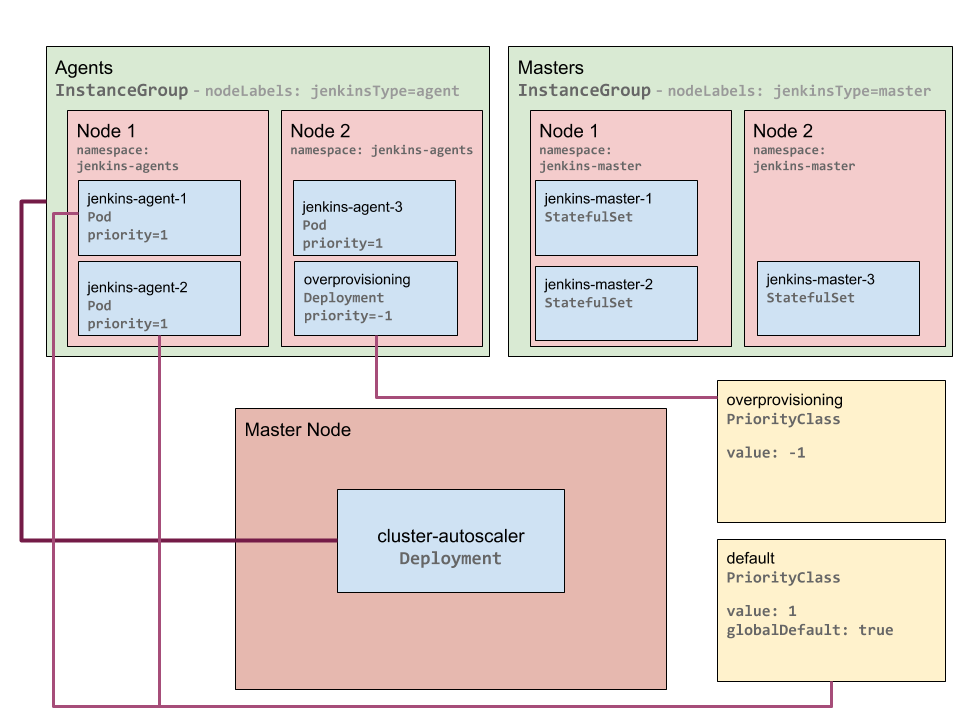
Kubernetes Just-in-Time Autoscaling - No wait for third agent
NOTE: Although GKE supports both autoscaling and priority/premption you are not able to modify the
expendable-pods-priority-cutoffflag of the Cluster Autoscaler. To work around this you will have to utilize aPriorityClassvalue of 0 for overprovisiong - as that is the default value for the Cluster Autoscaler.
Tradeoffs Between Speed and Cost
Under Utilized Nodes
When there are no agent pods there will still be at least one un-utilized node for the overprovisoned preemptible pod(s).
Furthermore, when an up-scale is initiated - a Jenkins agent pod may never end up on the new node - that is, the Jenkins agent pod(s) that initiated an up-scale may complete their work and be removed before more additional agent capacity is needed on the new node and a down-scale occurs before the up-scaled node is utilized by any Jenkins workload. One way to reduce this is to modify the Cluster Autoscaler scaleDownUnneededTime flag - by default it is 10 minutes but something lower than that may be more suitable for your CI/CD environment and reduce under utilization of the agent nodes.
Faster CI and CD
If you only look at cost from a cloud infrastructure point of view then under-utilized resources are definitely a big drawback of Just-in-Time autoscaling. But if you look at cost relative to the delivery of code to production and, more importantly, delivery of features to customers, then the increased speed may be well worth the additional infrastructure costs to support Just-in-Time autoscaling and faster CI/CD.
Now that we have a robust autoscaling solution for our Jenkins agents in place it is time to change gears a bit and look at securing the Kubernetes cluster where these agents are running. In the next post of the series we will look at pod security for the Jenkins agents and masters.