This is the first part in the series CI/CD on Kubernetes. In this part we will explore the use of Kubernetes Namespaces and the Kubernetes PodNodeSelector Admission Controller to segregate Jenkins agent workloads from the Jenkins server (or master) workloads - as well as other workloads on the Kubernetes cluster. As we continue on with the series we will see why this will serve as an important foundation for managing Kubernetes configuration for Jenkins agent related features such as autoscaling, resource quotas and security constraints.
NOTE: The configuration examples used in this series are from a Kubernetes cluster deployed in AWS using Kubernetes Operations or kops version 1.9 with Kubernetes RBAC enabled (which is the default authorization mode for kops 1.9). Therefore, certains steps and aspects of the configurations presented may be different for other Kuberenetes platforms.
Why Segregate
It is considered a best practice with Jenkins to have a distributed workload where the majority of your CI/CD workload is distributed across a pool of agents. Many CI/CD automation tools have a similar concept as Jenkins in distibuting much of the workload to agents running separately from the CI/CD server or master ; so this will most likely apply even if you aren’t using Jenkins for CI/CD. Of course it is also considered a best practice to have multiple Jenkins masters for a large organization, but having multiple Jenkins agents is absolutely critical to long-term successful CI/CD for organizations of any size. Whereas a Jenkins master is typically a long-lived and stateful application - a pet if you will, we want Jenkins agents that are dynamic and ephemeral - cattle. Kubernetes is a perfect platform to manage your herd of agents - specifically with the Jenkins Kubernetes plugin, so we will not only have a pool of agents, but we will have a dynamic pool where agents are created on-demand and destroyed after they are used. However, we also want to ensure that this dynamic agent workload does not negatively impact our Jenkins masters. We will accomplish that by segregating the two workloads. Kubernetes provides a number of capabilities that will allow us to achieve this segregation.
Namespaces and Node Pools
Kubernetes provides Namespaces to allow the segregation of Kubernetes objects within the same cluster. Additionally, many Kubernetes solutions have a concept of node pools. A node pool is a group of Kubernetes nodes with the same characteristics - such as the same instance type. Kops refers to node pools as InstanceGroups and for AWS they are backed by AWS Autoscaling Groups (ASG) where all the nodes in an InstanceGroup would be of the same EC2 instance type in addition to other defined characteristics. Kops provides the ability to create as many node pools (or InstanceGroups) as makes sense for your cluster - as does the Google Kubernetes Engine (GKE). To achieve the segregation between Jenkins masters and agents, we are going to create separate Namespaces and node pools that are individually specific to Jenkins masters and agents. This will result in all Jenkins agent Pods being on agent dedicated nodes and being isolated from nodes with Jenkins masters or other workloads on your Kubernetes cluster.
The following diagram illustrates the use of two namespaces and two InstanceGroups for Jenkins masters and agents:
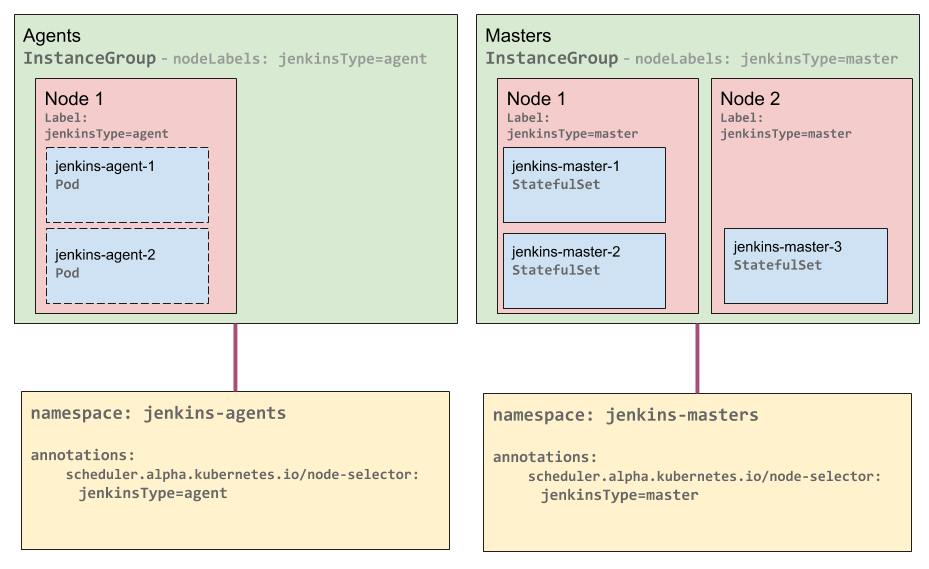
Kubernetes Jenkins Agent Segregation Diagram
NOTE: As of the date of this post, the Azure Kubernetes Service (AKS) does not support multiple node pools - per this GitHub issue it is on their roadmap.
Kubernetes Admission Controllers
To achieve segregation for the Jenkins agent workload to a specific node pool/InstanceGroup, we turn to Kubernetes Admission Controllers. Even if you don’t know what the Kubernetes Admission Controllers are or do, chances are that you have benefited from them if you have ever interacted with a Kubernetes cluster. For example, if you use a default StorageClass or a ServiceAccount then you are depending on an Admission Controller. In this case, we are going to utilize the PodNodeSelector Admisssion Controller. But first, we have to enable it for our cluster. For the version of kops used for this post - 1.9.3 - the following Admission Controllers are enabled by default (as you can see in the code for kops 1.9 here that is based on a recommended set of admission controllers):
    - Initializers
    - NamespaceLifecycle
    - LimitRanger
    - ServiceAccount
    - PersistentVolumeLabel
    - DefaultStorageClass
    - DefaultTolerationSeconds
    - MutatingAdmissionWebhook
    - ValidatingAdmissionWebhook
    - NodeRestriction
    - ResourceQuota
So we need to add PodNodeSelector. For kops you can do that by using the kops edit cluster command. If you don’t already have a configuration section for the kubeAPIServer then you will first want to run kops get cluster --full -o=yaml, then you can copy the kubeAPIServer section and just add it to your existing configuration (of course some of your values may differ):
apiVersion: kops/v1alpha2
kind: Cluster
metadata:
  creationTimestamp: 2018-05-24T01:06:51Z
  name: k8s.kurtmadel.com
spec:
  api:
...
  iam:
    allowContainerRegistry: true
    legacy: false
  kubeAPIServer:
    address: 127.0.0.1
    admissionControl:
    - Initializers
    - NamespaceLifecycle
    - LimitRanger
    - ServiceAccount
    - PersistentVolumeLabel
    - DefaultStorageClass
    - DefaultTolerationSeconds
    - NodeRestriction
    - ResourceQuota
    - PodNodeSelector
    allowPrivileged: true
    anonymousAuth: false
    apiServerCount: 1
    authorizationMode: RBAC
    cloudProvider: aws
    etcdServers:
    - http://127.0.0.1:4001
    etcdServersOverrides:
    - /events#http://127.0.0.1:4002
    image: gcr.io/google_containers/kube-apiserver:v1.9.3
    insecurePort: 8080
    kubeletPreferredAddressTypes:
    - InternalIP
    - Hostname
    - ExternalIP
    logLevel: 2
    requestheaderAllowedNames:
    - aggregator
    requestheaderExtraHeaderPrefixes:
    - X-Remote-Extra-
    requestheaderGroupHeaders:
    - X-Remote-Group
    requestheaderUsernameHeaders:
    - X-Remote-User
    runtimeConfig:
      scheduling.k8s.io/v1alpha1: "true"
    securePort: 443
    serviceClusterIPRange: 100.64.0.0/13
    storageBackend: etcd2
  kubeScheduler:
  ...
If you already have a configuration entry for the kubeAPIServer then just add PodNodeSelector to the end of the admissionControl list. Once you have saved the changes you will need to update your cluster - for kops: kops update cluster --yes. If this is an existing cluster then you will also have to perform a rolling-update: kops rolling-update cluster --yes.
NOTE: If you are enabling additional admission controllers on a new cluster you should do it before you apply the configuration or a rolling-update of all of your cluster nodes will be required.
Putting It All Together
So now that we have the PodNodeSelector admission controller enabled we can create the node pools and namespaces.
Node Pools
We will create two node pools - one for Jenkins masters and one for Jenkins agents.
Jenkins Master Node Pool
Create the node pool for Jenkins masters with kops create ig jenkins-masters and add jenkinsType: master as an additional nodeLabel. It should look similar to the following when you are done:
apiVersion: kops/v1alpha2
kind: InstanceGroup
metadata:
  creationTimestamp: 2018-05-25T11:28:57Z
  labels:
    kops.k8s.io/cluster: k8s.kurtmadel.com
  name: agentnodes
spec:
  image: kope.io/k8s-1.8-debian-stretch-amd64-hvm-ebs-2018-02-08
  machineType: m5.xlarge
  maxSize: 2
  minSize: 2
  nodeLabels:
    jenkinsType: masters
    kops.k8s.io/instancegroup: jenkins-masters
  role: Node
  subnets:
  - us-east-1b
Jenkins Agent Node Pool
Next we will create the node pool for Jenkins agents with kops create ig jenkins-agents and add jenkinsType: agent as an additional nodeLabel. It should look similar to the following when you are done:
apiVersion: kops/v1alpha2
kind: InstanceGroup
metadata:
  creationTimestamp: 2018-05-25T11:30:23Z
  labels:
    kops.k8s.io/cluster: k8s.kurtmadel.com
  name: agentnodes
spec:
  image: kope.io/k8s-1.8-debian-stretch-amd64-hvm-ebs-2018-02-08
  machineType: m5.xlarge
  maxSize: 4
  minSize: 4
  nodeLabels:
    jenkinsType: agents
    kops.k8s.io/instancegroup: jenkins-agents
  role: Node
  subnets:
  - us-east-1b
And because we are using kops InstanceGroups - any time we add additional nodes to either node pool it will automatically have the jenkinsType node label applied.
Namespace
Next we will create two namespaces. Again, one for Jenkins masters and one for Jenkins agents.
First we will create a namespace for our Jenkins masters:
apiVersion: v1
kind: Namespace
metadata:
  annotations:
      scheduler.alpha.kubernetes.io/node-selector: jenkinsType=master
  name: jenkins-masters
Next we will create a namespace for our Jenkins agents:
apiVersion: v1
kind: Namespace
metadata:
  annotations:
      scheduler.alpha.kubernetes.io/node-selector: jenkinsType=agent
  name: jenkins-agents
The scheduler.alpha.kubernetes.io/node-selector annotation is used by the PodNodeSelector admission controller to assign default NodeSelectors based on the namespaces where a pod is created. This results in all pods being created in the jenkins-agents namespace landing on nodes in the jenkins-agents node pool and being segregated from Jenkins masters.
NOTE: The
PodNodeSelectoralso has a file based configuration that allows you to not only specficy defaultNodeSelectorlabels for specificnamespacesbut also allows specifying aclusterDefaultNodeSelector. However, I have not yet figured out how to use this file based configuration with kops - so if you have any ideas on this, please comment below. There is a GitHub issue tracking this.
Jenkins Kubernetes Plugin Configuration
So now that we have node pools and namespaces for our Jenkins masters and agents we need to configure the Kubernetes plugin to use the jenkins-agents namespace. To start with, we must create a ServiceAccount in the jenkins-masters namespace as the requests for new dyanmic agent pods will be initiated by our Jenkins master running in the same Kubernetes cluster. For clarity, I will specify the namespace in the configuration and will use the ServiceAccount name jenkins.
---
apiVersion: v1
kind: ServiceAccount
metadata:
  name: jenkins
  namespace: jenkins-masters
Now we need to create a Kubernetes role to allow the jenkins ServiceAccount to create, use and delete pods, excute commands in pods and access pod logs in the jenkins-agents namespace based on the example provided in the Jenkins Kubernetes project.
kind: Role
apiVersion: rbac.authorization.k8s.io/v1beta1
metadata:
  name: jenkins-agents
rules:
- apiGroups: [""]
  resources: ["pods"]
  verbs: ["create","delete","get","list","patch","update","watch"]
- apiGroups: [""]
  resources: ["pods/exec"]
  verbs: ["create","delete","get","list","patch","update","watch"]
- apiGroups: [""]
  resources: ["pods/log"]
  verbs: ["get","list","watch"]

---
apiVersion: rbac.authorization.k8s.io/v1beta1
kind: RoleBinding
metadata:
  name: jenkins-agents
roleRef:
  apiGroup: rbac.authorization.k8s.io
  kind: Role
  name: pods-all
subjects:
- kind: ServiceAccount
  name: jenkins
  namespace: jenkins-masters
The primary difference between the example provided in the link above and the above configuration is the use of the namespace for the RoleBinding subjects.
Now you can use the ServiceAccount and jenkins-agents namespace we created with these instructions to configure the Kubernetes plugin for your Jenkins master and be assured that your distributed Jenkins agents will not negatively impact your Jenkins masters or any other workload you have running on your Kubernetes cluster.
In the next post of the series CI/CD on Kubernetes we will explore autoscaling for the Jenkins agent workload.